Saturday, May 28, 2016

Friend or FOE

I have read that some people dislike sewing wit foe, and even that they think foe looks cheap and adds a "home made" aesthetic to garments. 

And honestly it can. 

Fold over elastic can be a royal pain in the butt if you don't work with it correctly. 

But once you get the hang of it your items stop lettuce edging and you stop getting those weird skipped stitches and folded bits. 

I think a lot of people will use FOE once or twice and decide that it's not for them. 

But I had to use it three or four times before I got professional results. 

Here is my fourth time using FOE 


Can you say curly!

But I have found a way to sew up FOE that is all but bulletproof. 
First off, you sew it on in two passes. 


The first time you are stitching it to your fabric with the foe laying wrong side up and the right side of your fabric facing you. 

I recommend woolly nylon bobbin thread if you have it. So that the stitches on the FOE will be soft on your skin. 

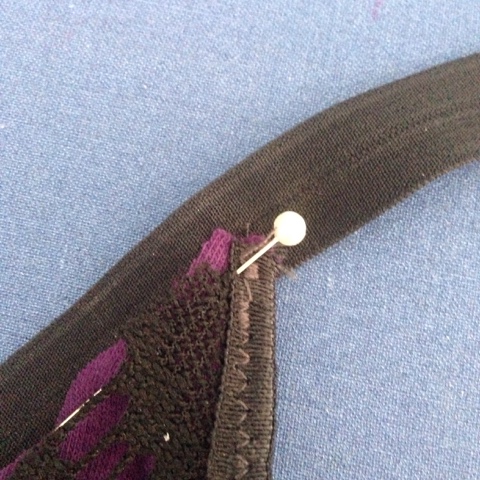
Then once the FOE is stitched down and secured, your fold it over! 


I find that if you use lots of pins you can stich it without having to worry about folding it as you go. 

This lets your feed digs move the fabric and elastic with minimal amounts of resistance. 

Which means no lettuce edges!!! 

Now I have found that one can sew right over the pins without any major catastrophes. 


I know I know...sewing over pins is evil and bad and wrong.... 

But it makes sewing in fold over elastic so much easier! 

I mean from the video you can see that it's still not exactly a breeze. I had to stop and lift my foot and smooth it out a bit. 

And I was going relatively slow...
But it was still easier then it could have been! 

And before I forget, there's one other great thing about FOE, 
You can use it as the strap and connect it smoothly. 


All you have to do is measure your strap length, and have that amount of elastic hanging off the end of the top of your bra. And then you have a professional looking strap!


What could be better! 


Tuesday, May 24, 2016

Redemption!

You very well may remember that failed dye bath of mine. 

While I didn't get the results I wanted, I did get some mighty fine denim blue lace. 


I'm quite proud of this color, and I have never been a wasteful Wendy. 

So I decided to change my origanal plan for a silk and lace nightgown and instead make a lace and jersy Mallory Lane.

I'm quite proud of the way it turned out! 


Construction was a breeze. The only thing that gave me trouble was the wiggly FOE I was working with. But more detailed on that are on their way next...


Along with the Mallory lane I also constructed a lacy thong and some lace breifs. 


I used Fehr Trade's pattern and my own self drafted pantie pattern. 

I did edit the thong pattern a smidge to my friends measurements. I'm hoping now that I didn't make the crotch covering bit too long...


High waisted thong? Is that a thing? 

I'm sure it's a thing. 
At the very least it's a thing now, because I have one sitting on my coffee table! 


Monday, May 23, 2016

Your Panties Should be Personal

I have been wanting to try my hand at print making for some time! 

So I decided that the perfect first project would be a pair of panties. 

Since they're small and if I screwed up hardly anyone would have to look closely. 

I started with this pair that I drafted for my friend Becca. 


And then I set to work carving away! 

I decided I would make stamps of some of her favriote things. 


Which also happen to be my favriote things! Doughnuts, pizza long boards and the word "booty"

Pro tip, when carving words, you my mat carve them backwards so the print will read frontwards. 

And if you carve it correctly the first time you don't have to carve it twice... 

I used paint from my local pat catan's, "wicker white"  is the name of it. 


It's nice, it stretches nice and it dries soft. It really becomes one with the fabric. 

Now I won't share my process with you, because I am no profesional. 

But my results are decent enough. 


I have some sloppy bits but, I really like the way it turned out. 


Oh and the story behind the "booty" stamp. 

Becca introduced me to this beautiful gem of a song, and it's been a running joke ever since!


And this joke will live on in the form of panties forever. 

Unless of course I did the heat setting wrong...

Wednesday, May 11, 2016

My Dye Bath Blunder

I desperately wanted a pastel grayish blue nightgown and pantie set. 

I had my rit, I had my various fabrics and my pot. I thought I was ready. 


I had nylon and spandex lace 


FOE from my usual place. 


And some silky polyester. 


I put it in my pot and boiled it with a minimal amount of supervision. 


My stretch lace responded swimmingly to the dye, it turned the color of denim jeans right way. 

And I must say it held the color beautifully 


The satin and the FOE however reacted in a strange way....

They turned lavender or lilac. 


I'm sure I'll get use out of the foe, but I'm not quite sure about the satin. I just have two fourth yard bits. 

My original plan wound have used all three together just fine. But now they clash...so I suppose I'll have to find a new plan. 

Until then, stay savvy friends. 


Self Drafting Isn't That Scary!

There are a lot of pantie patterns out there, 
this is due in part to the fact that panties are so easy to draft. 

Drafting is a scary concept to wrap your head around. 
There is a lot that can go wrong. 
But If you want to get into monetizing your sewing, 
self drafting is a necessary skill.

And after a bit of practice it really isn't so hard. 

It all starts with measurements. 


And then there is a bit of math. But it's nothing too hard 

First you take your hip measurement and divide it in half. You can do this evenly, or you can be fancy and place the side seams toward the back by adding more length to the front. 


I decided that I would be fancy. 

The second thing you need to do is account for the stretch in your fabric. I do this by taking my own Measurements and dividing them by the measurements of a pair of my own panties. You will get a decimal which when multiplied by the body measurements  will give you the mesurent of the garment. 


Above is the formula for our butt measurement. 

The next step is to start drafting. 
I like to use old magazine pages that have been taped together as pattern drafting paper. 
But anything will do. 

If you draft your pattern to be cut on fold you will need to divide your width in half. Don't forget to do this please! It's very important... 

It's a little intimidating, but for your first drafting adventure I suggest that you make a simple three peice breif. And I also suggest using a pair of your own panties to figure out the shape of each peice. 


It should look something like this. 

I hope this tutorial made sense. Like I said drafting is easy if you start simple, and there is nothing simpler than a good breif.

It can be plain and lovely


Or lacy and dyed 


Or color blocked, or even lace blocked! 

The possibilities are all but endless! Add frills straps or cutouts, whatever floats your boat! 

Monday, May 2, 2016

My Go-to Resources For Underthings

If you follow me here at the classy savage  you know that I am a poor broke student, trying to hone my skills and shrink my foot print on the world. 


So I search high and low for resources that I can justify spending what could go toward tuition on fabrics and whatnot.
It's hard for me to find stores and resources that cater to broke
So I figured I would sing the praises of the stores that I love. 

As well as confessing just how much I pick up from wall-mart...


Fabric 


Well there's a great article that talks about the requirements for lingerie fabric. 

I find a good supply at my local Walmart 
Go figure

And if I can't find it at Walmart I make the journey to Joann's 

Findings 


I'll level with ya'll, I wish I could lie to you and say that I only use super pretty rose gold rings and sliders.
But honestly I pretty much just steal the rings and sliders off of old bras that bite the dust. 


But some day, I will go to black bird fabrics, and I will justify buying a whole handful of silver sliders and rings. 

But until that day, I shall remain a scavenger. 


Elastic 


Ok, so I saved the best for last. 
My favorite place for fold over elastic is bowtiqueemilee. They are fantastic. They have every color you could imagine, sold by the five yards for only $1.50!! If that's not a bargain then I don't know one. 

And this store has fancy elastic! But I haven't gotten around to ordering anything. I just scroll through and drool~ 

Most of the time braided elastic does the trick for me, I pick it up at Walmart, but I'm probably going to buy a roll of it since I use so much. 


Well those are all of my go to shops and what have you.

I'm not sure if this post is a humble brag about how much control I have on my spending, or a confession that will isolate me from the rest of the sewing community...


I'll let you decide...

I'm sure that all of you have a supply wish list as well. What items have you been drooling over? 

A sea-bound Sierra

Two years ago I had a dream, a dream in which I had a killer swim suit. 


I wanted something that would keep the ~girls~ contained and cover up my belly, just a bit. 

And I wanted pretty lace~ 

Decided I would use Butterick B4526, since it seemed versatile. 
(spoiler alert, I'm going to use this pattern a lot this month) 


To make the bottoms I used the patten for the one peice, and I traced it on my fabric to the waist line. 


So about where that chopstick is. 

I used a green knit spandex and some white lining fabric for the bottoms. Along with a black WOVEN lace 

What was I thinking...

It still works, it's just hard to get on and off, but my origanal plan for the top would not work at all. 

Sadly I didn't know this until I had already made the top...

I was able to put it on for a photo. 


But it was so tight I couldn't get it on and off without dislocating my shoulders! 

So I abandoned the top and focused my efforts on finishing those bottoms! 

I used chlorine safe black braided elastic from Wallmart for the leg hole elastic 

I basted it down with a zig-zag on my pencils lines, folded it in, and stiched it down proper. 

And for the top Of the bottoms I sewed a chanel and put this fancy silicone elastic through the casing. 


And I tied it in a very secure knot, because puncturing the silicone with a needle would weaken it; and then it might rip. 

Once I had the bottoms constructed I took a minute to admire them, and then I addressed the issue of the missing top. 

Since this isn't France, I was going to need one. And I had waisted so much fabric on the first draft that wouldn't fit. So I decided to scrap together a Seria. 


I actualy had to peice it together with scraps of fabric green spandex, like a stretchy, conservative puzzle. 

Thankfully I had a ton of the black lace. The fabric had previously been a demonic shawl that the Devilette dancers wore in Jesus Christ Superstar.

So I have yards of it laying around, which made peicing the lace easy. 


I used black braided electric to finish all of the edges on this top peice as well. 


 And as far as editing the pattern goes, all I needed to do to turn it into a swimsuit was add about a foot to the wings of the pattern so I could tie it in the back. Rather that having a hook and eye closure. 


I have to say, this swimming suit is a bit more reveling than what I thought I was ready for. But once I put it on for the first time I felt unstoppable! 


We're getting down to our skivvies!!

Or at least, I'm making skivvies, I keep it G rated here on The Classy Savage!

I decided that I would do a theme month for May. 
I'll be upFront with you, I kinda forgot about "me made may"...
So instead I have planned a month dedicated to lingerie!!! 

How exciting is that!!!


I'll be sharing my latest makes, some small tutorials, resource lists and what not. 

So be sure to stay tuned~ 


It's going to be pretty swell~ 

Translate